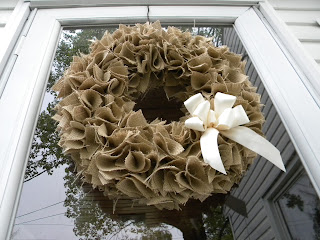
My love affair with burlap continues. Months ago I entered a giveaway to win a wreath just like this.
Of course I didn't win. Surprise, surprise! So, I decided to make my own.
And in case you are as obsessed with burlap as I, here is how you can make your own, too.
For starters, you will need a scissors, about 2 yards of burlap, a foam wreath form

and some of these little pin guys from the floral section of your favorite craft store.
Okay, here we go. Cut a 2 inch strip of burlap and wrap it around the wreath form, hot gluing as you go so it stays in place. (Oh yeah, I forgot to mention, you'll need a hot glue gun, too.)
It should look something like this.
Next, cut about 1,000,000,000 squares of burlap, approximately 2.5 inches. (Yes, this is a slight exaggeration, but not by much... you'll need a TON!)
Then, one by one, you will fold them in half.
And then fold them in half again.
Stick a pin through the corner that has both folds. (The corner shown above.)
I used two folded squares per pin.
Finally, start sticking the pins into the wreath.
Keep sticking, and sticking, and sticking. This should should take about FOREVER. Just when you think you'll never be finished, it will be done! I placed pins on three of the four sides of the wreath so that the side against the door was flat.
I added an ivory bow for a little something extra. You can add whatever you'd like... get creative.
Hope these directions are clear. If you make your own I'd love to see your pictures!
Have a great Wednesday!


This looks lovely! Thanks for sharing at Things I've Done Thursday this week.
ReplyDeleteYou had me at BURLAP! Seriously though, this is Gorgeous.. love the sweet white bow! HOpe you will hop on over to my under 300 followers blog hop @ http://pinkapotamus.blogspot.com/2012/05/under-300-followers-blog-hop-2.html
ReplyDeleteI am your newest follower~
xoxo
Amie @ Pinkapotamus
Cute idea for burlap - this looks great! We are so glad you came to another week of our fun "Strut Your Stuff Saturday". Please join us again! -The Sisters
ReplyDeleteThanks so much for the inspiration and awesome tutorial. I linked up your directions (because they're great!) on my blog:
ReplyDeletehttp://anothercraftyday.blogspot.com/2013/08/pinterest-challenge-alabama-football.html
Thanks again!
Hello! How did you attach the bow? Thanks!
ReplyDeleteO Gosh...It has been so long since I made this I don't even remember. And it stayed on the door of the house when we sold so I can't look to see. I'd guess I hot glued it in place. Or maybe I used a long wire to tie the bow and then looped it around the wreath. The second option would show from the back though. I hope this helps!
DeleteThanks so much for posting this tutorial. I am in the process of making one and my squares are too small. Bag to the drawing board with your measurement of 2.5x2.5. THANK YOU! It's beautiful!
ReplyDeleteSuper cute wreath. Love how full it is. I saw it on How to Make a Burlap Wreath .com and looked all over the web for the original post since the image has another name to it.
ReplyDeleteI made one only I didn't wrap it first. Then I poked the center of the square into the wreath with a knitting needle. It stayed but you could add a dab of glue before you push the fabric square in if you want.
ReplyDeleteOr a chopstick would also work instead of knitting needle. They are beautiful no matter how you make it!
ReplyDeleteBeautiful! Thanks for sharing!
ReplyDeleteI used straw wreath. I have made a lot of wreaths and I prefer the straw ones.
ReplyDeleteBeautiful wreath, but how do tou keep the burlap from raveling when it's cut? Mine is coming apart?
ReplyDeleteThat is stunning!! Can hardly wait to try it -- and my patience!!
ReplyDelete