Pages

Tuesday, February 28, 2012

Lent Centerpiece

As I sat down to eat my oatmeal this morning I knew something had to change...

I needed a new centerpiece.  My Valentine's Day arrangement had expired!
So, inspired by the Lenten season, here's what I came up with. 

And here's how to make your own...
  
You will need a wooden base, a dow rod (about 1/4 in diameter), wire, (one gauge that fits through beads, one a bit heavier to fix dow rods together)  wire cutter, and a collection of random beads.   
  
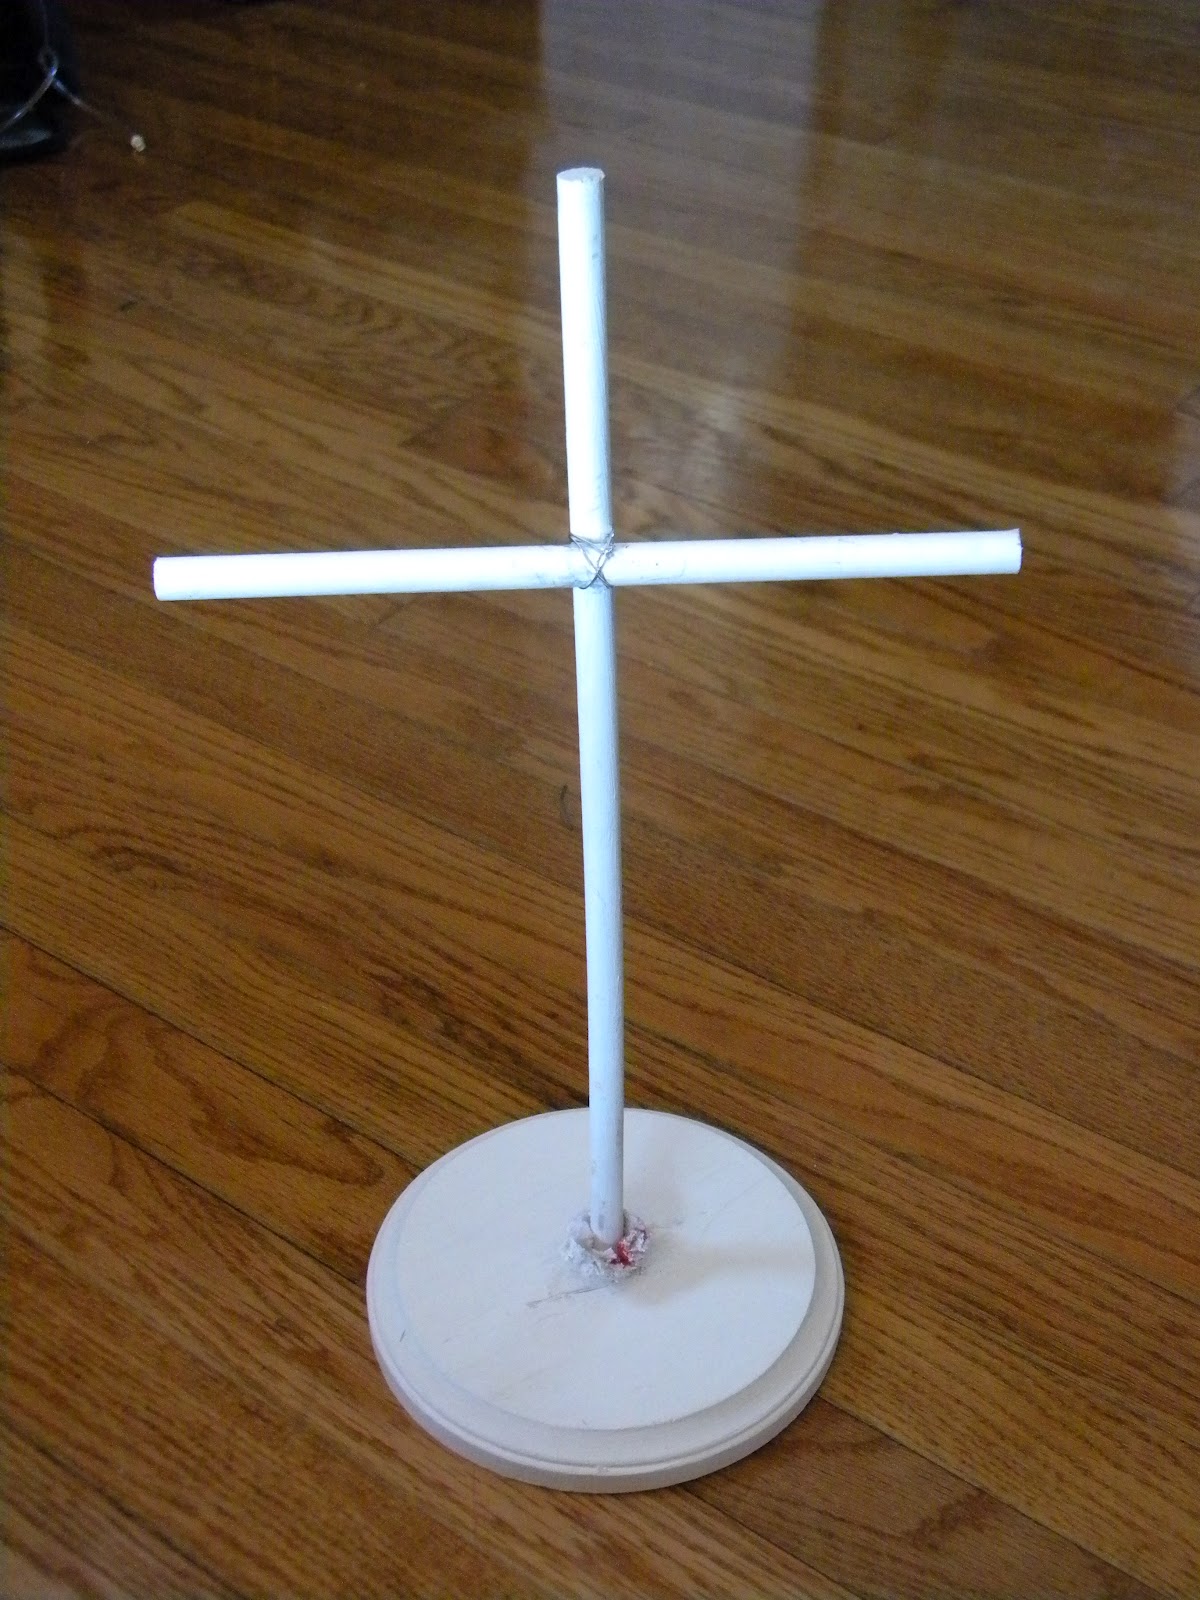
Cut your dow into two pieces, one slightly longer than the other, so that it will make a nice cross.  Next, drill a hole in the center of the wooden base so that the longest dow rod fits into it very snuggly.  

To create the cross fix the two dows together by tightly twisting a wire and wrapping it around as shown above.  
   
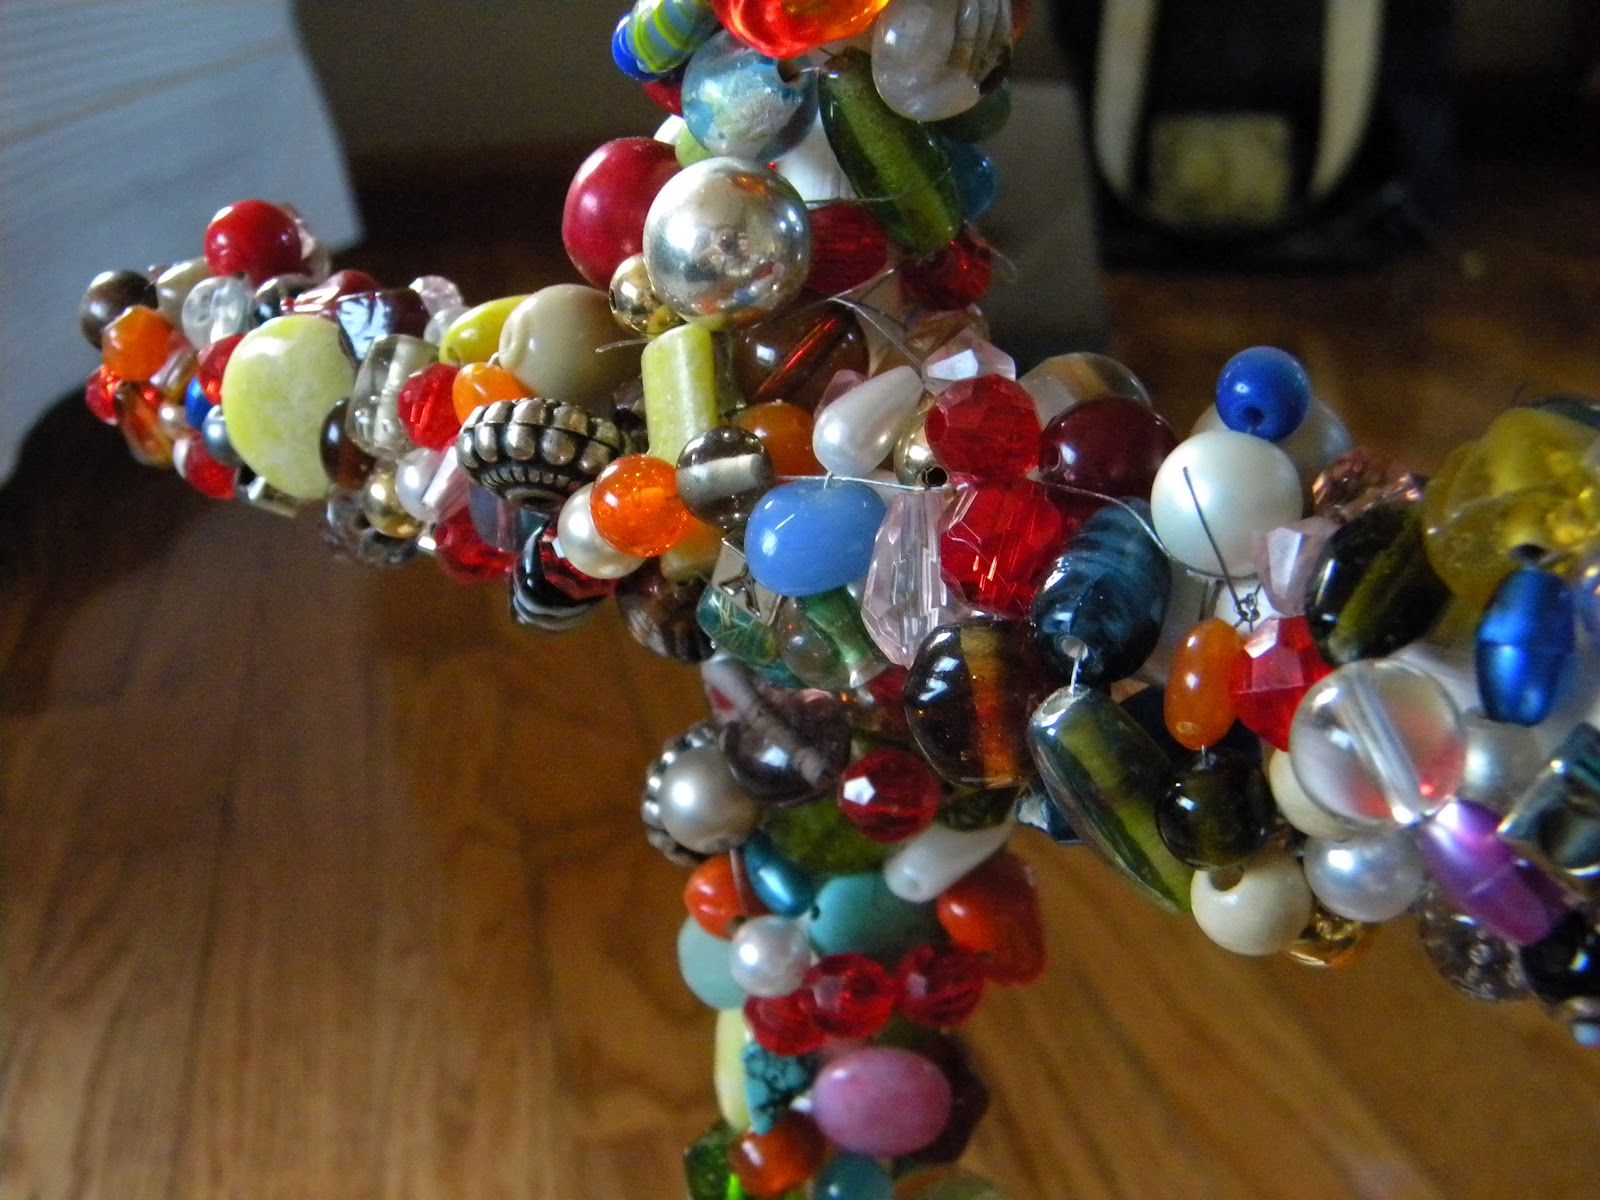
O.K. Moving on.  Fix the thinner wire to the base of the cross by twisting it tightly, using a jewelry crimp bead, or a simple square knot like I did.  Then, begin stringing.  I have a massive collection of mismatched beads from old projects and broken jewelry.  If you aren't a borderline hoarder like I am, I  think you can buy big bags of random beads at Hobby Lobby.   
  
Once you have a nice long strand, begin winding it around the dow.  The best part about this step is that you can't mess it up.    Every once in awhile twist the wire around or underneath itself to help secure the beads.   So, let's review... Strand, wind, twist, and repeat.  Work your way up the cross and across the arms.
As you work your way to the end of the dow rod, there will come a point where you can't wrap it without the beads slipping off the end.  Once this happens just start winding back the other way.  To cover the exposed ends apply hot glue and top with plastic or wooden beads.  (Hot glue doesn't work so super well on glass beads.)
  
And that's that!
  
Kinda looks like jelly beans, doesn't it?
  
I added this grass for a springy feel. You can find it in a 12x12 sheet at, where else but Hobby Lobby.
  

Now when I sit down for breakfast I'll be reminded of the Easter miracle!   
Jesus saves!
Thanks for stopping by!


Thursday, February 23, 2012

Photo Wall

I've always wanted to do this.  In fact, I've tried before and failed.  Actually, I've tried twice and failed.
That explains why I have an abundance of black frames and lots of holes left behind in the walls of apartments past.

This is the before...  
Here's the during...

Trace your selected frames on brown paper bags, cut out, and tape to the wall.  This will allow you to find just the right arrangement without pounding in a zillion holes in your wall. 

I taped off the corners and started hanging.  In hind sight I realized that I should have left the paper ones up, removed one at a time, and replaced it with the frame.  Oh well, my way worked too. 

I left some frames picture-less so that I would have a little flexibility in their arrangement, and just  filled them in afterwards. 

This is the after...
"K" Tutorial to come


Now I'm a far cry from a professional, but I've had enough flops to compile a list of tips for creating your own photo wall.  

1.  Plan ahead.  Do you want your arrangement to have a defined shape or a more organic one?   

2.    Only use photos that you adore. Good quality photos that you adore!  

3.  Find a common element for all the items you plan to hang.  I used all black frames.  All different shapes and sizes, but all black. I also used our last name as a theme.  One picture has Little Miss holding a Koenig sign.  One frame features a "K." The long frame on the bottom spells our name in those letter photos that you see absolutely everywhere.   

4.  Mat (or is it matte??) your photos.  It costs a little bit but makes a HUGE difference.  Don't worry about the smaller frames.  I chose to mat all 5x7's and larger, using the same mat for all.  

5.  Use a level!!!! Don't try to eyeball it.  If your frames are cheap like most of mine are, they don't come with any awesome hooks on the back, and therefore shift from time to time.  I bought this stuff called Candle Fast.  It's a wax that is typically used to hold candles upright in candle sticks.  I used a teeny tiny bit behind each frame and now I don't feel compelled to adjust them each time I walk in the room.  

If you create a photo wall of your own I'd love to see your finished product!

Saturday, February 18, 2012

Freebie Friday- Tea Dyed Dress

 A few weeks ago, I posted some family pictures that my friend Katie took for us.  I thought briefly spent a ridiculous amount of time planning our attire.  I wanted us all to coordinate, you know, look like we belonged together, without looking like we were trying too hard.  

I knew I wanted Munchkin to wear this tea-dyed onesie from a previous Freebie Friday.
So, on to Little Miss' dress, today's freebie. 
Etsy has, what I call t-shirt dresses, all over the place.  It's basically a t-shirt hacked off about half way down and an added skirt.  Simple right?!?
So here's what I did.  I found an old t-shirt from Little M's drawer and  tea-dyed  it.
Then, I added a two layered ruffle skirt. (insert imagination here!) There is no tutorial because I was really winging it.   
I hate to leave you hangin' so if you are interested,  Ashely over at Make It and Love It, has a nice tutorial, and a much more professional product if I must say so!


It turned out pretty cute, but a little rough.  The seam where the t-shirt met the skirt was a little frumpy, so I added this snazzy belt that I've been hanging onto for way TOO long.  No kidding, I think it's from Jr. High.  Sick, I know! 
Elastic that I had on hand helped to create more of a waist.  Finally, add a fun button.  Buttons make everything better!
So...
t-shirt from drawer...$0.00
tea from pantry...0.00
white fabrics from "Jamie's Mom" collection...0.00
belt from Jr. High...0.00
button from my stash...0.00
 total... FREE!!!
...and pretty stinkin' cute!
Thanks for stopping by!
Happy weekend!


Wednesday, February 15, 2012

Etsy L.O.V.E

I'm still in Valentine's day mode and I want to share my LOVE with my followers!
(Let's be honest, I forgot to post this yesterday!) 

Get 10% off in my Etsy shop.  
Here's how.  

1. Become a follower of Well Rounded. 
Already a follower?  Skip to step #2.
2. Post a comment below telling me about your Valentine.  

Here's what you'll find...


And so much more....


Thursday, February 9, 2012

Nails on a Chalkboard

Aren't there words that just ERK you?  You know, things people say that just make you cringe. 

As kids, there were certain words that just weren't allowed to come out of our mouths, and to this day I'd rather listen to nails run across a chalkboard than hear them.  


And, although I occasionally let them fly, here's the list of things I won't let my kids say, and what we replace them with.

"Shut-up"
Replace with "quite please"
"I'm gonna kill you."
 No replacement... just don't say it!

"Oh, my God"
(when not speaking about the Lord.)
  We replace this with "oh, my heavens," which sounds adorable coming from a two year old's mouth!

"dang-it" or "damn-it"
We use  "dog-on-it" (Is that right?? We say it, but I've never had to spell it!) 
Or "piffle"... thanks Grandma!

"stupid"
We say "silly," which in certain situations sounds very silly.

So, now I'm dying to know... what's on your list??


Wednesday, February 8, 2012

Momma's Boy

This one is for all the momma's boys out there.
 Today we are making this tattoo bib.
You will need iron-on transfer paper, light weight black and white cotton fabric, heavy terry cloth fabric, and basic sewing materials.
First, print off your tattoo image using the iron-on transfer paper.  Remember that your image will be flipped after it is ironed on.  "Mom" will look the same, but if you are picky about the way the scroll crosses the heart,  I'd flip it before you print.  Also, make sure you have the right type of transfer paper for your printer.  Laser jet paper doesn't work well with an ink jet printer...This is experience speaking!
Cut out the tattoo.  Follow the instructions provided with the transfer paper to iron the tattoo onto the light weight white fabric.  After it cools, peel off the paper. Using a pinking shears, cut out the tattoo, leaving 1/4" of white fabric around the tattoo transfer.

  I created my own bib pattern by tracing one of my favorite bibs on a 12x12" sheet of paper.  By using half of the bib for my pattern and cutting the fabric on a fold, you create a more symmetrical bib and reduce the amount of cutting you have to do. 
Following the pattern, cut your bib out of the terry cloth and black fabric.  Bath towels make a nice backing for bibs.  It is thicker and much more absorbent than terry cloth that you purchase by the yard. 


Now that we have all the pieces cut out it's time to assemble the bib.  Center the tattoo on the black bib and pin it in place.  Sew down with a small zigzag stitch.  
Pin the right sides of the black and the terry cloth bibs together.  

Before sewing the front to the back, the velcro has to be sewn on.  Sew one piece of velcro to the right side of the terrycloth and the other piece of velco to the opposite right side of the black bib.  (By right, I mean the correct side, the side that will face out when the bib is finished.)

Sew the two bibs together, leaving a hole at the bottom wide enough to turn the bib right side out. 
Before turning the bib right side out, put several snips in the curve along the neck.  Be sure not to cut into the seam.  This will allow the curve to lay nicely when it's finished.  

  
After turning the bib right side out there will be a lip of fabric sticking out of the hole.  Fold the excess fabric in and iron flat.  Continue ironing around the perimeter of the bib.  Don't iron the tattoo or the velcro...again, experience speaking.

Finish with a top stitch in matching thread.  
Done! Easy peasy! Don't you love it?? I do!
Want one without the work...just click here!
  
Thanks for stopping by!


Friday, February 3, 2012

Freebie Friday- Framed Patterns

 Today we are framing patterns.  These would be the perfect addition to your craft or laundry room. 

This project is FREE if you have a set of matching frames and a couple of old patterns.
 Start by emptying the pattern pieces from the envelope.  Place the envelope face down in the center of the frame and gently lay the pattern pieces over the top.  Secure the back of the fame and trim off the excess paper. 

 
Hang and done!


 I inherited vintage patterns just like these from (o.k. follow me now...) my brother's girlfriend's mom.  It would be easier to say they came from this woman I know, but the truth is that I never had the privilege of meeting her.  Jamie's Mom, Robin, lost her battle with ovarian cancer two years ago.

I've sorted through the heaps and saved some of my favorites, but there are still SO many, so... I want to share them.  I've decided sell them in my Etsy store.  All the proceeds will be donated to the Ovarian Cancer National Alliance in Robin's honor.
 
Thanks for stopping by!